This post was most recently updated on July 26th, 2024.
3 min read.This article documents a neat and simple way to establish and test a WebSocket connection, using just vanilla JavaScript and your favorite browser’s developer tools. Quick and easy – no external tools or libraries required! This is neat because you don’t want to have your information (credentials, hostnames, or even test data) leaking to outsiders hosting the tools – and using any external tools can be a bit of a drag anyway!
In the sample found in a few paragraphs below, we’ll instantiate a WebSocket connection, hook a listener to the onmessage event and the last line sends a simple payload down the WebSocket pipe, just to check if the WebSocket connection is working.
And if there IS a response, we’ll be logging it in the console. Handy! Though the article does expect you to have your API already up and running :)
Background
WebSockets, they’re all the rage, and for a very good reason; WebSockets are a great solution for a very typical web development problem: How to deliver dynamic updates to a view without implementing some sort of finicky polling methods in JavaScript?
After being established successfully, they make it possible for the server to force-feed your display layer (running in the browser) constant updates – such as live tweets about someone’s awkward date at a sushi place (as seen on Twitter), all of the pictures of your drunk uncle causing a scene at that one distant cousin’s, whose name you’ve forgotten, wedding (looking at you, Facebook) or a live comment feed for your favorite Mukbang-stream (with the death of Mixer, I suppose you’d go to Twitch for this).
Or maybe you’ll just need to push notifications to your front-end in that one corporate portal you’re developing. Be that as it may, I’m not judging. WebSockets are useful.
But back in the day, you couldn’t really use WebSockets, because there was a browser, that didn’t support them but was widely used. Can you guess which one was that? 😁

But nowadays, we’re actually good. Global adoption of WebSockets in different browser implementations is around ~96%. And it’s getting better and better by the day!
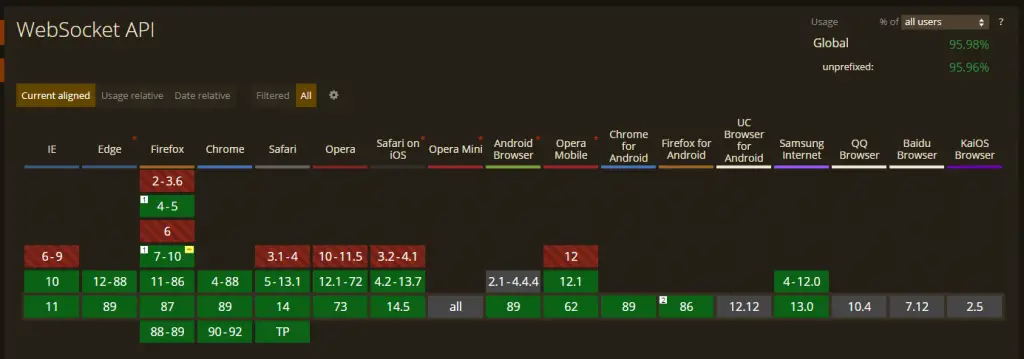
With that, it’s generally speaking pretty safe to implement any cool WebSocket thingies nowadays!
Problem
So you’ve got your API set up with a few cute WebSockets doing what WebSockets do best – passing packets in both directions using just one persistent TCP connection. Neat!
But how do you verify that it works, using just your favorite browser’s developer tools? Testing WebSockets is not as easy as just calling an URL – or even easy to do in most tools like Postman. In the next section, I’ll show you how to test your WebSocket connection in your browser.
Solution: Test a WebSocket connection in browser with JavaScript
This is yet another of those “note to self” kinda posts. If I need to google this again, I might as well just find the solution in my own blog, right? :)
So here’s a simple example:
let webSocket = new WebSocket('wss://localhost/api/ws');
webSocket.onmessage = function(e) { console.log(e)}
webSocket.send("test")
This allows you to run whatever WebSocket tests locally by essentially creating a test client in your browser and connecting to the WebSocket with that – without any external tools or libraries!
What’s this do, then? Let’s take a look in detail!
Time needed: 5 minutes
How to establish and verify a WebSocket connection from your favorite browser
- Establish the WebSocket connection
First line of the script establishes a connection (either with 1 parameter – the URL – or 2, where the second one is a sub-protocol request, which we won’t be needing right now).
So instantiating the WebSocket looks like this:let webSocket = new WebSocket('wss://localhost/api/ws'); - Create your own EventHandler for “OnMessage”
The second line simply makes it easy for us to follow responses from the server.
This handler just logs the incoming responses to the browser console:webSocket.onmessage = function(e) { console.log(e)}; - Test your WebSocket!
This part expects you to have something configured for your API that actually DOES react to a received message by responding back.
webSocket.send("test");
The last line sends a simple payload down the WebSocket pipe, just to see if something happens. If there IS a response, we’ll be logging it into the console. Handy!
And you should be good! That’s all for today. :)
Let me know if you’ve got a better way – let’s compare!
Oh – and as an additional bonus: If you want to test a WebSocket connection that requires authentication, my other article explains how to implement the server-side part:
References
- https://sahansera.dev/understanding-websockets-with-aspnetcore-5/
- https://en.wikipedia.org/wiki/WebSocket
- https://developer.mozilla.org/en-US/docs/Web/API/WebSocket/onmessage
- https://docs.microsoft.com/en-us/iis/configuration/system.webserver/websocket
- Intellisense not working for Fluent components in Blazor project? Easy fix! - October 8, 2024
- winget is broken again. - October 1, 2024
- How to fix PowerToys FancyZones in Windows 11? - September 24, 2024
