This post was most recently updated on July 28th, 2022.
5 min read.This post describes how you can modify your SPFx webparts to make them compatible with usage in Microsoft Teams. I’m also showing some basic ideas of what you can do in the code to make the integration more useful!
Why would we do this?
Who wouldn’t want to just develop once and then run their code everywhere? Now with SPFx (SharePoint Framework), 1.8 being out (and 1.9 being out for a while before being pulled!), we’re getting one step closer to that, as we’re given an elegant way to bridge the gap between your portals built on SharePoint, and Microsoft Teams where most of the collaboration happens. Teams are just getting more and more powerful – and you can make them even more powerful by extending them.
So, now you can just develop your functionality once, and then run it everywhere! Everywhere, in this case, SharePoint and Teams. But it’s a start!
What’s SharePoint Framework (SPFx)?
Let’s take a look at the basics – what’s the point of SharePoint Framework?
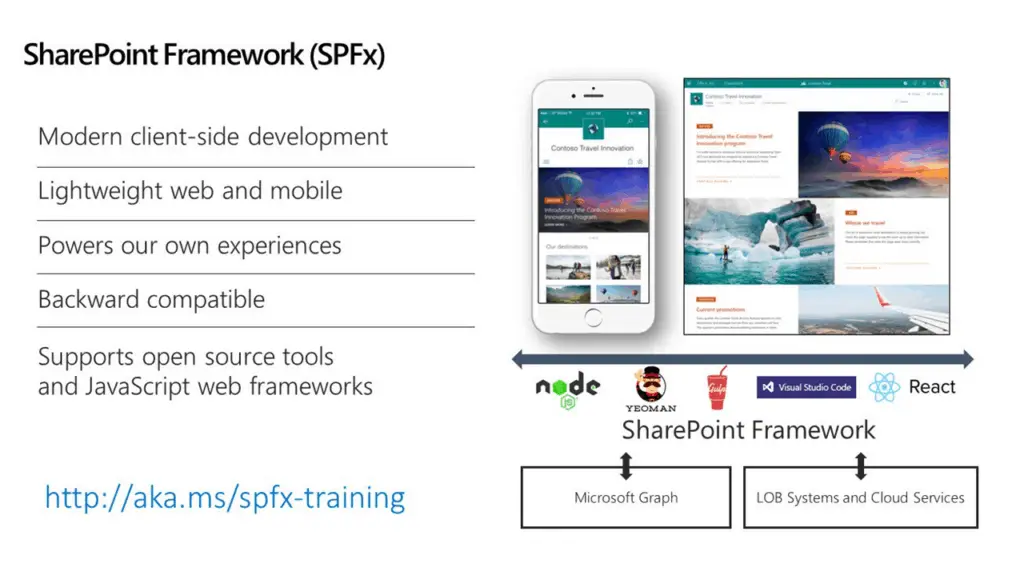
SharePoint Framework in a nutshell:
- Client-side execution model
- Rendered & executed in-page context
- The only way to customize modern pages
- Open-source cross-platform tooling
- Responsive, accessible & mobile friendly
- Scoped to tenant or site
- Limited to creating client-side web parts & UI extensions
With Microsoft Teams, the situation is similar. An SPFx webpart can be hosted on a Modern SharePoint site and surfaced in a tab in Teams.
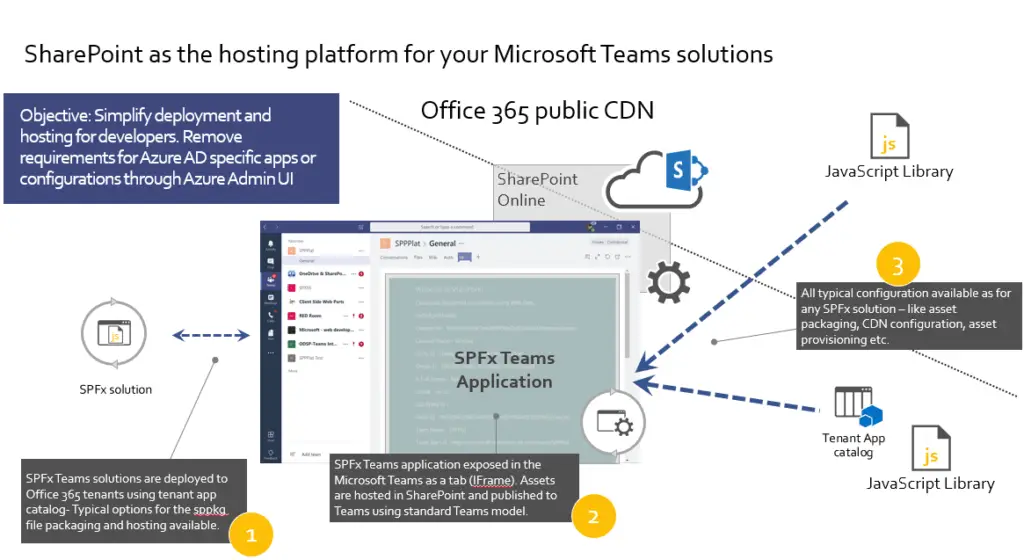
Okay – so we know the basics, now let’s jump into the action!
Getting started on teamsifying your SPFx solutions
Yeah, so I’m calling this Teamsifying, and there’s nothing you can do about it, so let’s just get past it and into the process!
Whatever your normal SPFx development flow is, typically you’ll be able to adhere to it. In my example, I’m using Visual Studio Code – let’s see how it goes.
Getting started
First of all, if you’re sideloading apps (which is what we’re doing today), you’ll need to enable Teams development on your tenant. You can do this by accessing the development mode from your profile menu in Teams:

And then accept by selecting “Switch to developer preview”.

Now you’re ready to load your custom thingies into Microsoft Teams!
While we’re at it, let’s make this useful!
First of all, let’s use an existing Modern Calendar webpart, that we have on our tenant. Why? Because weirdly enough, Teams lacks a Calendar app for a team!

Weird huh? But it’s not a problem, since you can always use the SPFx webparts developed for your SharePoint sites! That way, we’ll be able to use some Open Source code to bring new useful functionality into both SharePoint and Teams at once!
Steps for getting your SPFx webpart into Microsoft Teams
So, let’s jump into it!
1. Creating a Teams manifest for your solution
This step is currently unnecessarily complicated – but will be more straightforward in the future for sure.
Basically, you’ll need to craft a zipped folder, that’ll act as a manifest and icons for the app that we’ll register with Teams.
The easiest way to do this is to download a premade .zip -package, which we’ll be then modifying. A suitable example of such a file can be downloaded from my GitHub account, for example.
After you’ve got the package, unzip it as a “teams” folder (just a convention – you can actually name it whatever you want) in your solution. When you open the file called manifest.json, you need to replace a couple of things inside it – see below:
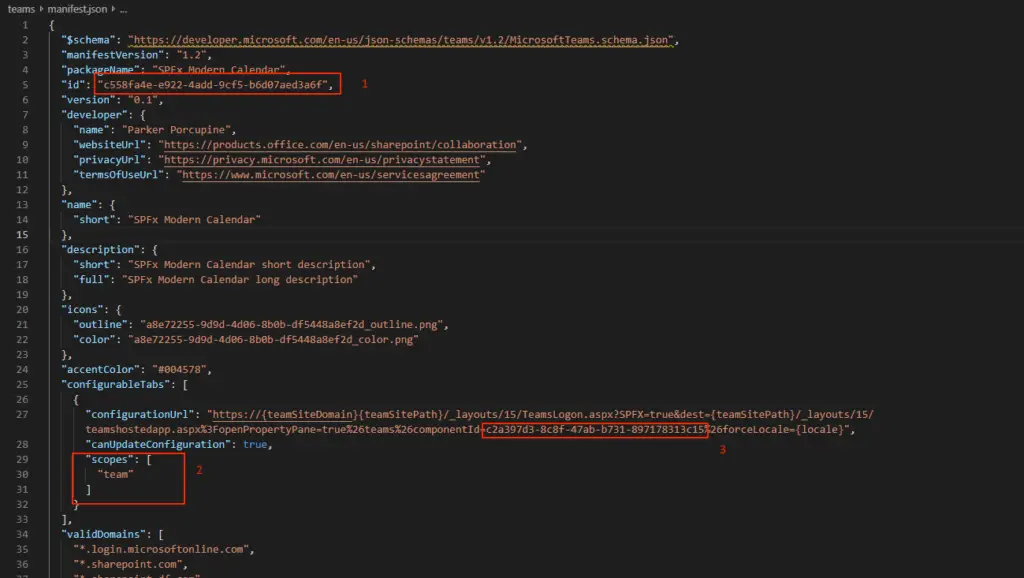
You can find the guid that you’ll need from another file, called YourWebPartname.manifest.json. See an example below!
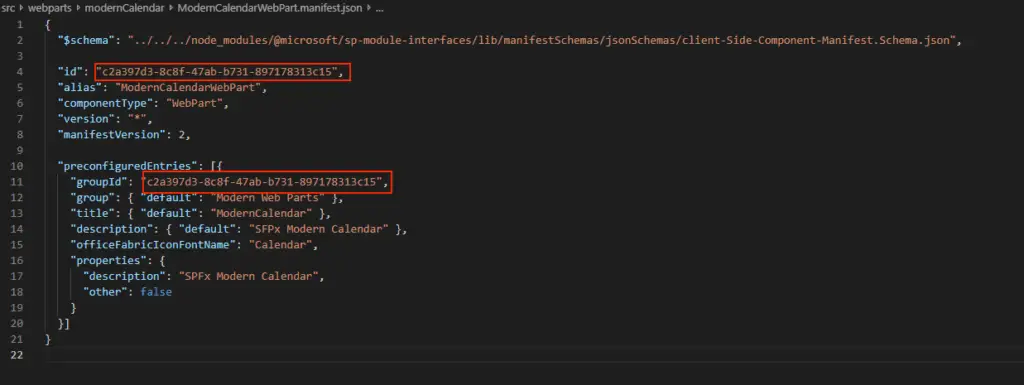
When that’s done, go ahead and zip the files back up – you’ll need the manifest and the 2 icons in.
Then navigate to your team in Microsoft Teams, and select “Manage Team”.

After that, select Apps, and on the right bottom hand of the screen, there’s a text “Upload a custom app”. Select that.

Now select your zip package, and give it a go. If you get an error about the manifest being malformed, verify 2 things:
- You zipped the right thing (should only contain the 3 files, no folders or anything)
- You didn’t mess up the manifest file’s syntax (use a tool such as VSCode to verify it’s not broken, or just grab an unmodified one and try again)
After that, you should be able to add a new tab with the name you specified for your app! You can do that either from the app listing or from the channel view of your team.

So, now you’ve got the SPFx webpart in your Teams. Great job! However, that’s only half of the fun.
2. Update the SPFx webpart to use at least SPFx 1.8
To make the webpart work nicely with your channels, there’s another thing we can do. We can grab the actual Teams context and access some properties from the Team the webpart is now added to.
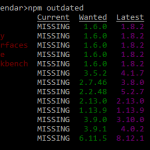
To achieve this, You’ll need to update the webpart to SPFx 1.8+. I’ve posted about this before, so while the basic idea is to run this in your solution:
npm install @microsoft/sp-core-library@latest --save
npm install @microsoft/sp-module-interfaces@latest --save
npm install @microsoft/sp-webpart-base@latest --save
npm install @microsoft/sp-webpart-workbench@latest --save
gulp --update
You can find more info (there’s plenty more, I assure you) here:
so – with that done, let’s add the code to actually do something with the context!
3. Add functionality that actually integrates the webpart into Teams
First, let’s grab the context! You’ll need to import the namespace:
import * as microsoftTeams from '@microsoft/teams-js';Then add a private variable where we’ll store the context, and grab it when we’re running the OnInit(). Below, I’m adding the private right after declaring the webpart class:
export default class ModernCalendarWebPart extends BaseClientSideWebPart {
private _teamsContext: microsoftTeams.Context;
If you already have code in the OnInit method, you'll need to add this:
protected onInit(): Promise {
let retVal: Promise = Promise.resolve();
if (this.context.microsoftTeams) {
retVal = new Promise((resolve, reject) => {
this.context.microsoftTeams.getContext(context => {
this._teamsContext = context;
resolve();
});
});
}
return retVal;After this, let's do something with the context! To just show a simple example, in this example (inside render() -function), if we have a dark theme coming from the Teams context, we'll flip the colors in the webpart's styles as well:
public render(): void {
/// ...
if (this._teamsContext) {
// We have teams context for the web part
if (this._teamsContext.theme.toLowerCase() == "dark") jQuery("#spPageChromeAppDiv").css("filter","invert(100%)");
}
// ...
}
And we should be done!
References
Latest posts by Antti K. Koskela (see all)- Am I the problem? Even onboarding to the Apple ecosystem failed miserably. - July 8, 2025
- Any kubectl command throws “Unhandled Error” err=”couldn’t get current server API group list: Get \”http://localhost:8080/api?timeout=32s\”: dial tcp [::1]:8080: connect: connection refused” – what do? - July 1, 2025
- “Sync error. We are having trouble syncing. Click ‘Sign in again’ to fix the issue.” in OneNote? Let’s fix it! - June 24, 2025


![SPFx | Failed to load component. [SPLoaderError.loadComponentError]: ***Failed to load component "9951b316-c8f2-4e27-887a-b7a46b3e94a0" (ContosoSPFxWebPart). Original error: ***Failed to load path dependency "ContosoSPFxWebPartLocalization" from component "9951b316-c8f2-4e27-887a-b7a46b3e94a0" (ContosoSPFxWebPart). Original error: Error loading https://component-id.invalid/9951b316-c8f2-4e27-887a-b7a46b3e94a0_1.3.1/ContosoSPFxWebPartLocalization Unable to load script https://contoso.sharepoint.com/sites/contosoapps/ClientSideAssets/490f3be2-7e8a-4fe5-8d6b-49ae5d7c4a2e/s-ContosoSPFxWebPartLocalization_en-us_2b301efaa958eadafbad865f710d89e4.js ***INNERERROR: ***Failed to load path dependency "ContosoSPFxWebPartLocalization" from component "9951b316-c8f2-4e27-887a-b7a46b3e94a0" (ContosoSPFxWebPart). Original error: Error loading https://component-id.invalid/9951b316-c8f2-4e27-887a-b7a46b3e94a0_1.3.1/ContosoSPFxWebPartLocalization Unable to load script https://contoso.sharepoint.com/sites/contosoapps/ClientSideAssets/490f3be2-7e8a-4fe5-8d6b-49ae5d7c4a2e/s-ContosoSPFxWebPartLocalization_en-us_2b301efaa958eadafbad865f710d89e4.js ***CALLSTACK: Error at t [as constructor] (https://spoprod-a.akamaihd.net/files/sp-client-prod_2019-03-15.008/sp-pages-assembly_en-us_2676c0dcef2e33d08d5b8433ef878499.js:889:16049) at new t (https://spoprod-a.akamaihd.net/files/sp-client-prod_2019-03-15.008/sp-pages-assembly_en-us_2676c0dcef2e33d08d5b8433ef878499.js:1512:21125) at Function.e.buildErrorWithVerboseLog (https://spoprod-a.akamaihd.net/files/sp-client-prod_2019-03-15.008/sp-pages-assembly_en-us_2676c0dcef2e33d08d5b8433ef878499.js:1512:16214) at Function.e.buildLoadComponentError (https://spoprod-a.akamaihd.net/files/sp-client-prod_2019-03-15.008/sp-pages-assembly_en-us_2676c0dcef2e33d08d5b8433ef878499.js:1512:12245) at https://spoprod-a.akamaihd.net/files/sp-client-prod_2019-03-15.008/sp-pages-assembly_en-us_2676c0dcef2e33d08d5b8433ef878499.js:1512:60385](https://www.koskila.net/wp-content/uploads/2019/04/2019-04-01_12-56-521-150x150.jpg)