This post was most recently updated on July 31st, 2024.
9 min read.Unlike most of my articles, this one isn’t a description of an issue I had and the workaround or fix that I found. This time, I’m writing about something I found fun and pretty impressive – a fully functional continuous integration and deployment pipeline from a git repository all the way to your Android handsets, set up in less than an hour, using GitHub Actions and App Visual Studio App Center.
Background
I suppose the title could’ve also been:
How App Center actually makes it so easy to share new versions of your Android apps, built with .NET MAUI and hosted on GitHub, that you can set the basic stuff up in less than an hour, which – even though getting the rest of the things to work might take a couple of days and the documentation might not always be up-to-date – is still quite impressive.
But that would’ve been a bit of a mouthful, wouldn’t it?
What started as a short, nice and bright post about something actually working surprisingly nicely, turned into a tutorial, but I hope it’ll be helpful for someone else this way too.
Anyway – on to the topic.
Getting started with GitHub
Most developers are already familiar with GitHub, so I’m not going to make this a GitHub 101 – and I wouldn’t be the most qualified person to do that either. But instead, let’s take a look at what you can do with GitHub, and how I use it in this example.
GitHub is primarily used as a version control system, allowing developers to track changes to their code over time, collaborate with others, and revert to earlier versions if necessary.
My code for my MAUI app is hosted on GitHub, in a single repository.
With GitHub, you can collaborate with other developers and contribute to open-source projects. You can fork a project, make changes, and submit a pull request to have your changes reviewed and potentially merged into the original project.
And with GitHub Discussions, you can collaborate and communicate within one repository – much like you’d use GitHub Issues, but without the inherent (or even quite explicit) link to code GitHub Issues has.
I’m the single contributor for my project, so not much collaboration going on here.
GitHub provides a built-in issue-tracking system that lets you report bugs, suggest new features, and discuss other project-related topics.
Since I’m the only one on the project, I don’t expect to get much feedback. I could always file bug reports myself, but I’m not THAT by the book.
GitHub provides tools (like markdown & readme for your repositories and GitHub Pages for dedicated documentation sites) for creating and hosting documentation for your projects, making it easier for others to understand and use your code.
I’m not even going to go into documentation. Sorry, not sorry.
This is more or less the core of your traditional DevOps – GitHub Actions allows you to automate your workflows, including building, testing, and deploying your code. DevOps can help you save time and reduce errors – because you’re shipping quickly, and catching issues earlier.
Most of this article will concentrate on using GitHub Actions and sprinkling some lightweight DevOps coolness on your project.
In my case, from my local dev environment, whenever I have something barely worth shipping (as in updating the app on my phone), I will commit the code to GitHub. Hence, the pipeline will come in quite handy.
But let’s not get too far ahead of ourselves – how does one develop and build a MAUI app anyway?
Getting started with MAUI builds
Okay – so MAUI was uncharted territory for me. But luckily, Microsoft seems reasonably good at updating its documentation even though the platform moves pretty quickly.
An extra brief overview of why MAUI is awesome
MAUI, or .NET MAUI, stands for .NET Multi-platform App UI. Another fantastic branding choice by Microsoft. I’m only half-joking here because while it’s confusing and ditched a fairly well-known and liked brand (Xamarin, or lately Xamarin.Forms), it DOES underline the fact the technology is quite a step forward from Xamarin, and brings a lot of new innovation on the table in the form of Blazor Hybrid and Mobile Blazor Bindings. Instead of figuring out almost any mobile-specific stuff or even Windows Desktop development, you can mostly just hack together a Blazor Webassembly application and package it to build native applications for Windows, Android, iOS and even macOS.
Theoretically, you can even hack together something for Linux, but I doubt it’s going to be officially supported anytime soon. 2022 was the year of Linux Desktop, bringing its market share all the way to *checks notes* over 2%. So it might not be enough to warrant a lot of work in the framework.
But with all the other major platforms, you’re good with MAUI.
Building MAUI on desktop
MAUI development is still a little bit finicky – any Windows Update, Visual Studio update or .NET update might break your development environment. But it doesn’t happen that often, and there are always workarounds available… But it means that building a MAUI app, even locally, can be a little bit laborious.
But the long story short is, you’ll need to install the dotnet SDK, install the right workloads (the exact ones depend on the particularities of your MAUI project), install platform-specific dependencies (like Java for Android), configure any platform-specific dependencies (like adding a Keystore for Android), and then just run dotnet publish with a few parameters.
How to publish an Android app
To publish a proper Android app, you need to take a couple of extra steps after you’ve hacked your code together.
Your project properties should all be valid, to begin with, but you’ll need to generate an application package (.apk) which is securely signed (which you can do with a Keystore that you can create for your project yourself).
To generate the Keystore, run something like this in a shell window:
cd "c:\YourSolutionFolder"
keytool -genkey -v -keystore myapp.keystore -alias key -keyalg RSA -keysize 2048 -validity 10000
The latter command will ask for a password – you’ll need it to publish your app later, so make note of it, and store it in a password manager or perhaps Azure Key Vault.
After this, you should add something like this in your project file – don’t worry about the missing values.
<PropertyGroup Condition="$(TargetFramework.Contains('-android')) and '$(Configuration)' == 'Release'">
  <AndroidKeyStore>True</AndroidKeyStore>
  <AndroidSigningKeyStore>yourapp.keystore</AndroidSigningKeyStore>
  <AndroidSigningKeyAlias>key</AndroidSigningKeyAlias>
  <AndroidSigningKeyPass></AndroidSigningKeyPass>
  <AndroidSigningStorePass></AndroidSigningStorePass>
</PropertyGroup>
Now you should be ready to publish a signed package! You can do this by running this in the command prompt:
dotnet publish -f:net7.0-android -c:Release /p:AndroidSigningKeyPass=mypassword /p:AndroidSigningStorePass=mypasswordAfter this, there should be an .apk package with a name like “net.koskila.yourapp-Signed.apk”, or something along that idea, in your /publish folder.
There’s a decent article by Microsoft on this – see here: Publish a .NET MAUI app for Android with the CLI
What else?
Running this locally is not that different from when you’re running it on GitHub. Just remember to commit any stuff you can’t really do in a Runner, like the Keystore (encrypted – and add the password to GitHub secrets) because you’ll need it for the publish.
Building MAUI on GitHub
I got started following this great guide: https://blog.taranissoftware.com/building-net-maui-apps-with-github-actions
Essentially, you’ll just run the same commands in your Tasks that you’d run locally. The App Center publish uses a custom task, that is essentially just an abstraction of further Terminal commands we probably don’t need to usually care about. Well, I didn’t need to.
Long story short, create a new GitHub Actions workflow, with contents somewhat like this:
name: MAUI CI build

on:
  push:
    branches: [ main ]
    paths-ignore:
      - '**/*.md'
      - '**/*.gitignore'
      - '**/*.gitattributes'
  pull_request:
    branches: [ main ]
  workflow_dispatch:
permissions:
  contents: read

env:
  DOTNET_NOLOGO: true                     # Disable the .NET logo
  DOTNET_SKIP_FIRST_TIME_EXPERIENCE: true # Disable the .NET first time experience
  DOTNET_CLI_TELEMETRY_OPTOUT: true       # Disable sending .NET CLI telemetry

jobs:
  build-android:
    runs-on: windows-latest
    name: Android Build
    steps:
      - name: Checkout
        uses: actions/checkout@v2

      - name: Setup .NET
        uses: actions/setup-dotnet@v1
        with:
          dotnet-version: 7.0.x
          include-prerelease: true

      - uses: actions/setup-java@v2
        with:
          distribution: 'microsoft'
          java-version: '11'

      - name: Install MAUI Workloads
        run: |
          dotnet workload install android --ignore-failed-sources
          dotnet workload install maui --ignore-failed-sources
      - name: Restore Dependencies
        run: dotnet restore your-project.csproj

      - name: Publish MAUI Android
        run: dotnet publish -f:net7.0-android -c:Release /p:AndroidSigningKeyPass=${{secrets.keystorepassword}} /p:AndroidSigningStorePass=${{secrets.keystorepassword}}

      - name: Upload Android Artifact
        uses: actions/[email protected]
        with:
          name: android-ci-build
          path: YourProject/bin/Release/net7.0-android/*Signed.apk*

  appcenter:
    needs: build-android
    runs-on: ubuntu-latest
    name: AppCenter Publish

    steps:

    - name: Download a single artifact
      uses: actions/download-artifact@v3
      with:
        name: android-ci-build

    - name: upload artifact to App Center
      uses: wzieba/AppCenter-Github-Action@v1
      with:
        appName: AppCenterOrganization/MyApp
        token: ${{secrets.APP_CENTER_TOKEN}}
        group: Testers
        file: /home/runner/work/your-app-Signed.apk
        notifyTesters: true
        debug: false
You can see a bunch of mumbo-jumbo like ${{ secrets.stuff }}. These are references to repository secrets I’ve set, and you should replace mine and use yours instead.
Distribute your app using App Center
Remember HockeyApp? Microsoft Visual Studio App Center is the direct successor to HockeyApp, making it fairly straightforward for you to distribute your app releases to different platforms seamlessly.
While the primary way for using App Center would probably be by using it to submit new builds to app stores – iOS App Store and Android Play Store, namely – it also supports using Microsoft Intune for scenarios where you don’t want to use app store but need some control, or simply offering the apps for downloads for groups of users using App Center’s own app portal.

You can also use App Center for building and testing, but I’d prefer to use GitHub for that (mostly because I’m more familiar with using it – App Center might be just fine, too.
Configuring App Center with your GitHub Actions
I had never used App Center before this configuration, but to my delight, the process was somewhat self-explanatory. Well, reading the docs helped. For once.
Firstly, you’ll register an account for the Visual Studio App Center. Shouldn’t matter much which kind of account you use – you’ll get a moderately nice grant of build minutes and other resources for free in any case.
Anyway, after signing in, you’ll see this small button on the right top part of the page.

You’ll need to register a new app for each platform you’re targeting. Don’t worry about the Release type – that one you can change afterwards.

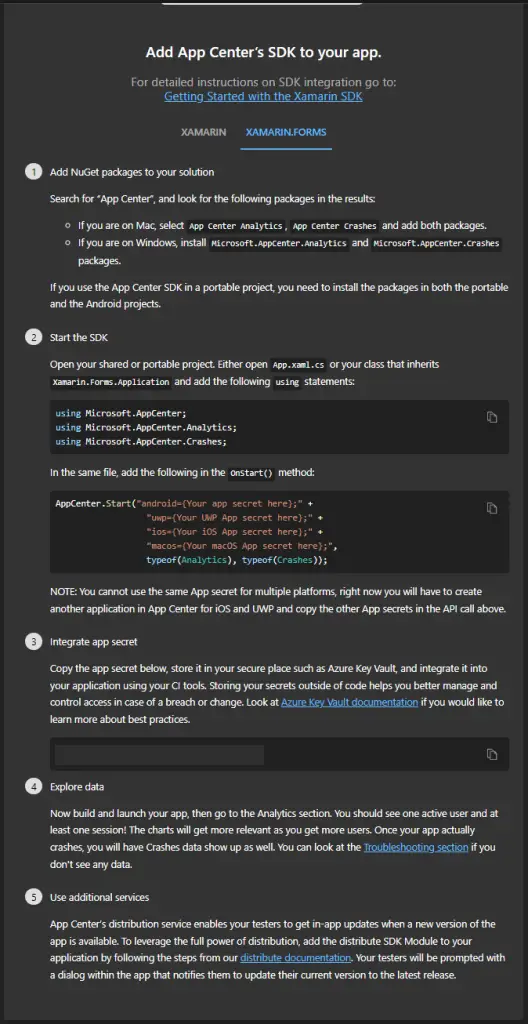
After registering the app, you’ll get this surprisingly accurate and helpful guide (especially considering it’s for Xamarin / Xamarin.Forms and not MAUI exactly) – but you won’t need these steps for distributing new versions of your app. Getting the actual in-app upgrades to work, is a bit more complex – couldn’t get it to work in an hour, so I’m leaving it outside the scope of this little tutorial.
So, below I’ll share the actual guide as a screenshot, and my adjusted steps on how to release new versions of your app as a simplified how-to.

For simply making the new versions of your app available through the App Center Portal, you don’t actually need to bother with the app-specific token or any of the NuGet packages. So let’s take a look at my how-to…
Time needed: 20 minutes
How to use App Center to publish new versions of your MAUI / Xamarin.Forms app?
- Create a new group of testers in the App Center
You’ll need to define who gets your new app versions. In the App Center, this happens by creating a new Group and adding people to it with their email addresses.
You can do this by going to your App registration in the App Center > Distribute > Groups > “+” - Generate an App Center API token
You’ll need to create an App Center API token to let GitHub push new releases for your app. You can create one by navigating to your app registration in the App Center, then Settings > App API Tokens.
The token will have pretty non-granular access – “Full Access” is required. - Add your token to your GitHub Repository secrets
Store the token you just created to your repository’s secrets on GitHub. You can do this by navigating to:
Your Repository > Settings > Secrets and variables > Actions > New repository secret
I have named mine APP_CENTER_TOKEN in the screenshot below.
- Add a GitHub Actions task for App Center to your workflow
name: upload artifact to App Center
uses: wzieba/AppCenter-Github-Action@v1
with:
 appName: your-app-center-rorganization/your-app-center-app
 token: ${{secrets.APP_CENTER_TOKEN}}
 group: Testers
 file: /home/runner/work/your-app-Signed.apk
 notifyTesters: true
For future usage, do copy the app-specific app secret (as opposed to App Center Tokens) that App Center gives you, store it in a secure place such as Azure Key Vault, and integrate it into your application using your CI tools.
Storing your secrets outside of code helps you better manage and control access in case of a breach or change. Look at Azure Key Vault documentation if you would like to learn more about best practices.
There’s more detail on the distribution available here: distribute documentation
This way your workflow will automatically upload new versions of your app to the Visual Studio app centre, and it’ll be available for download from there.
While setting up this workflow took little more than an hour, figuring out how to increment the application version, properly upload it to App Center and automatically distribute updates to users (or your “Distribution Groups” as App Center calls them) using an in-app update took me way more time, and hence will be outside the scope of this particular article. I’ll probably post about it later, though!
Giving it all a go!
Okay – at this point you should be good to run your workflow.

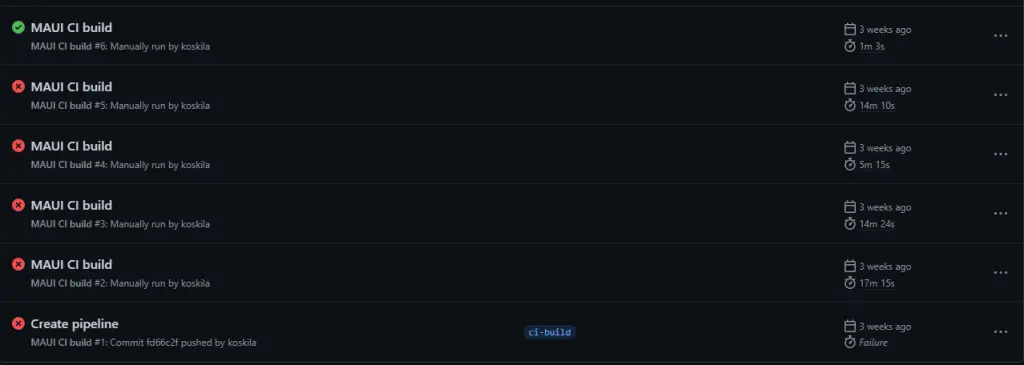
And with any luck, after adding a couple of spaces to fix line indentations and maybe a typo in your secret reference, you should get a successful run, somewhat like this below:

And after you see the first green badge appear, you should also start getting these spammy emails (remember to check your spam folder):

Next steps?
You might want to think about updating your logo, fixing your versioning (in case it’s still broken for MAUI when you’re reading this article – I’ll post a workaround later), maybe enabling automatic in-app updates (another article topic, I think), and eventually start pushing your app to Play Store, App Store or Intune.
But for now – that should be it. Happy coding!
References
- https://learn.microsoft.com/en-us/appcenter/distribution/stores/
- https://learn.microsoft.com/en-us/appcenter/sdk/
- https://learn.microsoft.com/en-us/dotnet/maui/android/deployment/publish-cli?view=net-maui-7.0
- How to fix PowerToys FancyZones in Windows 11? - September 24, 2024
- How to export the whole SSL (or TLS) certificate chain based on the original using PowerShell? - September 17, 2024
- How to solve keyboard shortcuts not working in Google Chrome on Windows? - September 10, 2024


