This post was most recently updated on September 25th, 2021.
2 min read.Azure Functions use dependency injection, and that allows us to define all kinds of prebuilt or custom-built services as being available for our functions really easily. This is a really easy way to initialize scoped resources to be used in your different functions… But how do you actually configure them in an Azure Functions App?
Problem
Okay, a step back – there’s a bit of a problem that we need to resolve before we can proceed with the configuration. When you create a new Azure Functions project, there’s a thing we’re missing:

That’s right! There’s no StartUp.cs or similar file. Nothing like Program.cs either.
So… If we don’t even get access to the file, how do we add our dependency injections in the Configure -class?
Luckily, once again, the solution is simple!
Solution
We’ll simply need to copy-paste some code from the internet! In this case, just grab the snippets below, or you can try this GitHub repo where I committed a fully functional example project:
https://github.com/dodyg/practical-aspnetcore/tree/3.1-LTS/projects/azure-functions/StartupExample
If you don’t want to browse the repo, you could just follow the steps below! What I’m doing is adding a new class, designating it as something that’s run during the StartUp, and then adding the service configuration there.
Time needed: 10 minutes
How to add a StartUp.cs file for your Azure Functions project?
- Add a new C# class file to your project.
This file can be named pretty much anything, but I reckon a good convention is to place it at the root of your project and maybe even call it StartUp.cs

- Select the file and open it up
It’ll look somewhat like this:

- Add the following using -statements
using Microsoft.Azure.WebJobs;
using Microsoft.Azure.WebJobs.Hosting;
In a matter of seconds, these will give you access to the attributes and interfaces that you will need! - Add the following attribute to your namespace
[assembly: WebJobsStartup(typeof(StartUp))]
This defines your class to be run at the startup of your Azure Functions app! - Add the following interface to your StartUp class
StartUp : IWebJobsStartup
That’ll instruct the runtime to run the right thing, and gives you instructions on what to implement, such as… - Implement Configure ()
Somewhat like below:
public void Configure(IWebJobsBuilder builder)
{
} - Finally, add a reference to your own project
In my case, it’s like below:
using StartUpExample;
Below is an example of all of the things you need to add:
- Now you can configure your services just like you would in a .NET Core Web API project!
… well, almost. Adding services happen by accessing the IServiceCollection under builder – like so, for adding an Entity Framework Core database context with some configuration options presented:
builder.Services.AddDbContext(options1 =>
{
options1.UseLazyLoadingProxies(false);
options1.UseSqlServer(
config["ConnectionStrings:DefaultConnection"],
builder =>
{
builder.EnableRetryOnFailure(5, TimeSpan.FromSeconds(10), null);
builder.CommandTimeout(10);
}
);
});
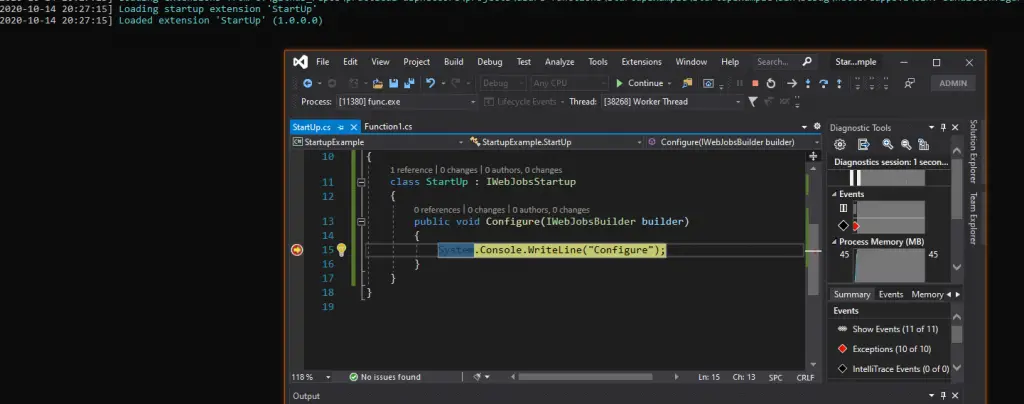
And you should be done! You can run something like below to verify that the Configure -method gets to run and your breakpoint actually does stick:

References
Probably the best resource (but a broader sample) is this blog post by Gunnar Peipman.
- How to generate Certificate-Signing Requests using OpenSSL - June 18, 2024
- Home Assistant 2024.4 changes weather forecasts – what to do? - June 11, 2024
- External path “**” cannot have more than one “*” wildcard with vite? - June 4, 2024


