This post was most recently updated on January 6th, 2023.
5 min read.This post explains how to add new Owners to your Office Groups using PowerShell. If your group has ended up without any owners, PowerShell might even be the only option, since the graphical user interfaces for Office Groups management are not that good.
Background
The hype around Office Groups kind of died down a little bit a while back, since their role wasn’t that clear – they didn’t really do much, and were confusing for end users. Back then, I posted about them replacing Site Mailboxes in SharePoint Online – because that was the first very visible and kind of useful thing they were good for!
Now that they’ve re-emerged and since stabilized as the security model and kind of the overarching unifying factor for SharePoint team sites, Microsoft Teams teams (that branding is just.. yeah.), Planner and a whole lot of other services, managing them suddenly became important again. And this added visibility is great, since they more or less power everything related to collaboration in Office Graph API, too, so sorting out your Office Groups is pretty important nowadays.
One of the issues you might run into, however, is the case of orphaned Groups. A group is supposed to have one or more owners, but it’s also entirely possible to create a Group (programmatically) without owners or have the only owner leave the organization and the Group is left with nobody. This complicates its management since members might not be allowed to add new members or manage different resources in the Group.
Symptoms
You have no users that are allowed to make changes to an Office group or the SharePoint team site. This makes managing the group, and the SharePoint team site it’s linked to, rather difficult.
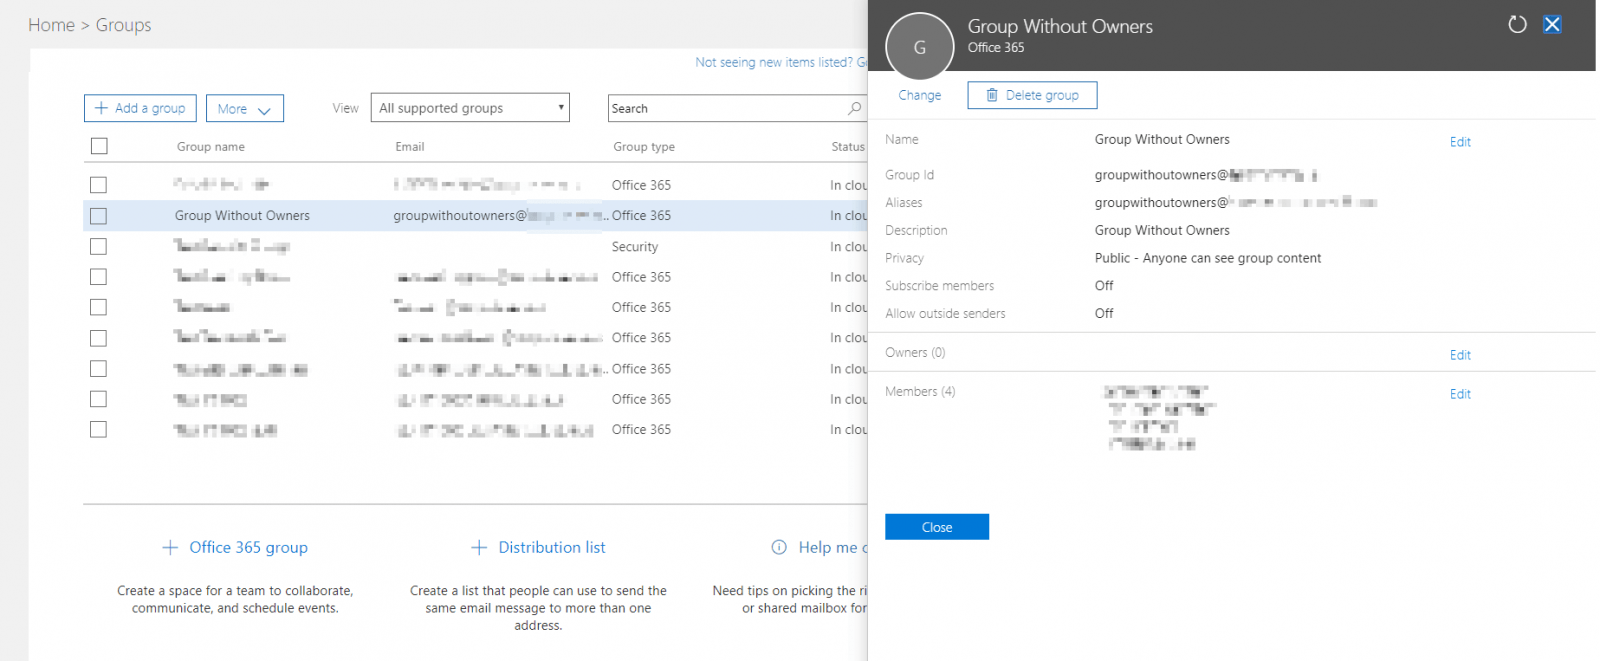
You can modify the Group’s memberships using Office Admin Portal (Microsoft has a decent guide on how to do that) like shown in the screenshot below.
In this post, however, I’m going to show you how to do it in PowerShell.
Solution
You can use PowerShell to add a new owner to a “unified group” – which is the name Exchange Online uses for Office Groups.
I’ve recently posted about what’s essentially the same process, but for Microsoft Teams – you might want to check that out as well.
But for fixing a Unified/Office Group – here’s how:
Prerequisites to adding a new owner to an Office Group
- You are using a user account with awesome permissions. Some Office 365 admin permissions are required, documentation is a little bit hazy on this.
- DotNetMafia suggests that Global Administrator is required.
- It worked for me with “just” Exchange Administrator as well, so I’d say that’s the minimum required permissions level.
- If your user account has MFA enabled, you can’t run the Exchange Online PowerShell cmdlets, but rather need to install the Exchange Online shell – there’s a discussion here on how to do that.
With that in order, you’re ready to proceed!
How to add a new Owner to an Office 365 Group using PowerShell
Time needed: 30 minutes
You will now be able to proceed to add a new Owner using Powershell
Don’t want to read through the whole thing? Just jump to the script by clicking this!
- Open Powershell (don’t use SharePoint Online Management Shell)
At least I had to run it as an admin. Don’t use SharePoint Online Management Shell – you never know if some of the imported commandlet names might conflict!
- Store your credentials
<pre lang="powershell">$cred = Get-Credential</pre>
This opens a login window, where you can give your admin credentials. - Establish a session with Exchange Online
<pre lang="powershell">$session = New-PSSession -ConfigurationName Microsoft.Exchange -ConnectionUri https://outlook.office365.com/powershell-liveid/ -Credential $cred -Authentication Basic -AllowRedirection</pre>
The ConnectionUri is the same for all tenants! Don’t change it. - Then import the established session
<pre lang="powershell">Import-PSSession $session</pre>
Executing this command should actually take a while, as PowerShell is importing a lot of commandlets here. After it’s done, you are able to run the next command. If you aren’t, you’ll need to make sure you have enough permissions on the account you’re using! - Figure out the alias of your group (you’ll need it in a sec)
Running something like this returns your groups. Exchange Online calls Office Groups UnifiedGroups. That might be a bit confusing, but it’s very fitting for their role as the one, unifying the access to all different Microsoft tools in Office 365.
<pre lang="powershell">Get-UnifiedGroup</pre>
This command will output something like the below: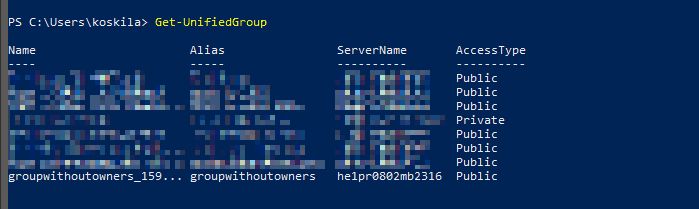
“Get-UnifiedGroup” cmdlet produces a list of your Office 365 Groups with some default properties shown
Alternatively, you could run this to get only the “orphaned” groups (without a single owner):<pre lang="powershell">$Groups = Get-UnifiedGroup | Where-Object {([array](Get-UnifiedGroupLinks -Identity $_.Id -LinkType Owners)).Count -eq 0} | Select Id, Alias, DisplayName, ManagedBy, WhenCreated<br>
ForEach ($G in $Groups) {
Write-Host "Warning! The following group has no owner:" $G.Alias
}
</pre>
This will produce something like this:
This magic command shows only the Office 365 Groups without Owners. In this case, there’s just one, and its properties are shown nicely.
If you then need to get just one group (if you want to investigate its properties, for example), you can run this:<pre lang="powershell">Get-UnifiedGroup -Identity [alias from the list above]</pre> - Add your account (or any other) as a member of the group, then as the owner
This order of commands is required – only members can also be owners! You’ll get an error like this if you try adding the user account as an owner without first making them a member:
<pre lang="powershell"><only members="" can="" be="" owners="" of="" a="" group.="" please="" add="" 'koskila'="" first="" as="" before="" adding="" them="" owners.="" +="" categoryinfo="" :="" notspecified:="" (groupwithoutown...c4-9678a42bd27b:adobjectid)="" [add-unifiedgrouplinks],="" ad="" notamemberexception="" fullyqualifiederrorid="" [server="HE1PR0802MB2186,RequestId=64556147-88ed-4788-90aa-0cbea612cd84,TimeStamp=10/9/20" 18="" 7:54:39="" pm]="" [failurecategory="Cmdlet-ADNotAMemberException]" ae3249d5,microsoft.exchange.management.recipienttask="" s.addunifiedgrouplinks="" pscomputername="" outlook.office365.com="" <="" pre=""></only></pre>
Running these commands yields no output if successful.<pre lang="powershell">Add-UnifiedGroupLinks [alias_from_above] -Links [your_upn] -LinkType Member
Add-UnifiedGroupLinks [alias_from_above] -Links [your_upn] -LinkType Owner</pre> - Verify, that the operation was successful
You can then verify the success by running this:
<pre lang="powershell">Get-UnifiedGroup -Identity [alias_again] | Select Alias,ManagedBy
</pre>
This should produce your group with your account in the “ManagedBy” column. - The End Game: Add yourself as the owner of all orphaned groups
So, taking what we’ve learned today, in short, this is the script you can use to add yourself as the owner of all the orphaned Office 365 Groups:
<span id="script"> </span>
<pre lang="powershell">$cred = Get-Credential
$session = New-PSSession -ConfigurationName Microsoft.Exchange -ConnectionUri https://outlook.office365.com/powershell-liveid/ -Credential $cred -Authentication Basic -AllowRedirection

Import-PSSession $session

$groups = Get-UnifiedGroup | Where-Object {([array](Get-UnifiedGroupLinks -Identity $_.Id -LinkType Owners)).Count -eq 0} | Select Id, Alias, DisplayName, ManagedBy, WhenCreated
ForEach ($g in $groups) {
                Add-UnifiedGroupLinks $g.Alias -Links $cred.UserName -LinkType Member
                Add-UnifiedGroupLinks $g.Alias -Links $cred.UserName -LinkType Owner
}
</pre>
Hope this helps! :)
He's been a developer from 2004 (starting with PHP and Java), and he's been working on .NET projects, Azure, Office 365, SharePoint and a lot of other stuff. He's also Microsoft MVP for Azure.
This is his personal professional (e.g. professional, but definitely personal) blog.
 certificate from a website using PowerShell?")

