Home » Posts » Tech » Fixing the “Could not load file or assembly or one of its dependencies” error
Fixing the “Could not load file or assembly or one of its dependencies” error
This post was most recently updated on April 18th, 2024.
3min read.
This post describes how to fix the “Could not load file or assembly ‘[assemblyname]’ or one of its dependencies. An attempt was made to load a program with an incorrect format.” error.
The solution described in this post shows you how to resolve the issue when you’re deploying from Visual Studio but get an error somewhat like the above when deploying to IIS or when opening your website after the deployment.
This applies to your local development environment.
This article provides a guide to resolving the “.NET assembly loading error” encountered during IIS deployment. The error typically arises from architecture mismatches, specifically when a 64-bit application is deployed to a 32-bit IIS Express. The solution involves configuring IIS to run in 64-bit mode, which aligns with the application’s architecture. The process is outlined in four simple steps, ensuring a smooth deployment in a local development environment.
Especially while installing a new dev machine, and building your project for the first time, you may end up getting the following exception:
Could not load file or assembly ‘[assemblyname]’ or one of its dependencies. An attempt was made to load a program with an incorrect format.
No fear, though, as this is usually easily fixed. In quite a few cases, it’s simply a mismatch between architectures and easily changed.
Reason
The latter part of the error message should point you in the right direction. “An attempt was made to load a program with an incorrect format.” That means that the assembly, which was to be loaded, was in an unexpected format. The format, in this case, refers most likely to the 64-bit build of an application being deployed to IIS, which is being run in 32-bits.
Why do I think that’s the case? Well, see – by default, Visual Studio uses a 32-bit version of IIS Express (Internet Information Services Express – the free lightweight web server that ships with some Windows versions and are useful for local development with Visual Studio) for your deployments. And if you’re building your solution in x64, running it in 32-bit IIS Express won’t work.
In case you know what you’re doing, it’s safe and easy to change this, though.
In my case, I was indeed building a 64-bit application. Therefore I also had to change the IIS to run in a 64-bit version. That’s luckily quite easy!
Solution: Change the IIS Express to run in 64b
I’ll explain below, how to do this in 4 simple steps. Like, really simple.
Time needed: 2 minutes
How to change IIS Express to run in 64-bit mode?
You’ll need to enable 64-bit IIS Express from VS settings
This is an easy, one-click configuration change, but it is hidden quite deep in the Options. First, open up your Visual Studio.
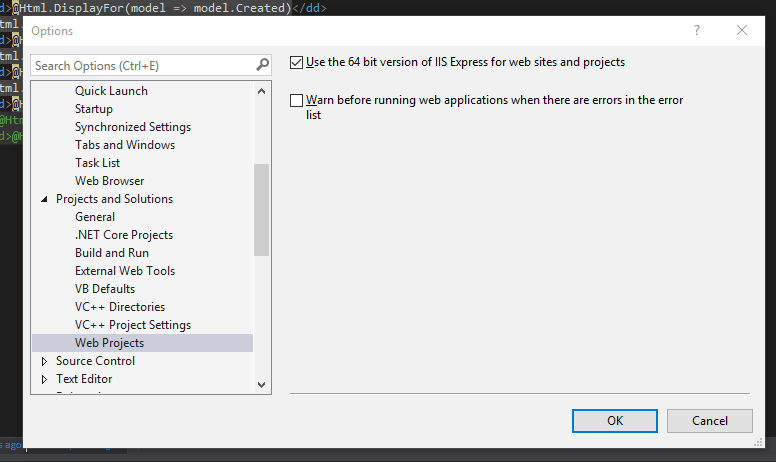
Navigate to Visual Studio – Tools – Options – Projects and Solutions – Web Projects
Alternatively, use the search for and write “64 bit”.
Select “Use the 64-bit version of IIS Express for websites and projects”
This’ll look something like in the picture below: IIS Express 64-bit version – how to fix the “Could not load file or assembly…” -error
Hit “OK” to save your changes.
That’s it. 4 (or really more like 3) simple steps!
And you should be golden!
Let me know in the comments -section below whether it worked or not. It sure did for me :)
Antti Koskela is a proud digital native nomadic millennial full stack developer (is that enough funny buzzwords? That's definitely enough funny buzzwords!), who works as Solutions Architect for Precio Fishbone, building delightful Digital Workplaces.
He's been a developer from 2004 (starting with PHP and Java), and he's been working on .NET projects, Azure, Office 365, SharePoint and a lot of other stuff. He's also Microsoft MVP for Azure.
This is his personal professional (e.g. professional, but definitely personal) blog.

 is out - good time to update!")

